使用Spring Data JPA 简化持久层的开发
最近看到SpringSide 最新版的技术选型 中提到了Spring Data JPA ,号称只需要实现接口就可以实现大部分操作。真有怎么神奇?于是Google一番,果然好使,在这里记录一下:
需要的包
spring 3.x(4.0)
spring data jpa 1.4.2
spring data commons 1.5 or later
hibernate 4
JUnit 4.11
log4j 1.2.14
配置文件 persistence.xml 根据JPA的规范,要在类路径下的META-INF文件夹中创建persistence.xml 文件,spring提供了org.springframework.orm.jpa.LocalContainerEntityManagerFactoryBean 来进行配置,persistence.xml中的属性都可以在这个bean中进行注入。
1
2
3
4
5
6
7
8
9
10
11
12
13
14
15
16
17
18
19
20
21
22
23
24
25
26
27
28
29
30
31
32
33
34
35
36
37
38
39
40
41
42
43
44
45
46
47
48
49
50
51
52
53
54
55
56
57
58
<?xml version="1.0" encoding="UTF-8" ?> <persistence xmlns ="http://java.sun.com/xml/ns/persistence" version ="2.0" > <persistence-unit name ="appName" transaction-type ="RESOURCE_LOCAL" > <provider > org.hibernate.ejb.HibernatePersistence</provider > <properties > <property name ="hibernate.connection.driver_class" value ="com.mysql.jdbc.Driver" /> <property name ="hibernate.connection.url" value ="jdbc:mysql://localhost:3306/appname" /> <property name ="hibernate.connection.username" value ="root" /> <property name ="hibernate.connection.password" value ="root" /> <property name ="hibernate.dialect" value ="org.hibernate.dialect.MySQL5Dialect" /> <property name ="hibernate.show_sql" value ="true" /> <property name ="hibernate.format_sql" value ="true" /> <property name ="hibernate.use_sql_comments" value ="false" /> <property name ="hibernate.hbm2ddl.auto" value ="update" /> </properties > </persistence-unit > </persistence > ``` **说明:** 1. **persistence-unit**是定义一个单元名称,可以定义多个,在实际使用的时候选择其中一个就可以了。将在后面的**applicationContext.xml**中使用。 2. 这里的META-INF是classpath下的目录,不是WEB目录下与WEB-INF同级那个目录,要注意区分,我刚开始的时候就是混淆了这两个目录,搞了很久。 ### applicationContext.xml ```xml <?xml version="1.0" encoding="UTF-8" ?> <beans xmlns ="http://www.springframework.org/schema/beans" xmlns:xsi ="http://www.w3.org/2001/XMLSchema-instance" xmlns:context ="http://www.springframework.org/schema/context" xmlns:tx ="http://www.springframework.org/schema/tx" xmlns:jpa ="http://www.springframework.org/schema/data/jpa" xsi:schemaLocation ="http://www.springframework.org/schema/beans http://www.springframework.org/schema/beans/spring-beans.xsd http://www.springframework.org/schema/context http://www.springframework.org/schema/context/spring-context.xsd http://www.springframework.org/schema/tx http://www.springframework.org/schema/tx/spring-tx-2.5.xsd http://www.springframework.org/schema/data/jpa http://www.springframework.org/schema/data/jpa/spring-jpa-1.0.xsd" > <context:annotation-config /> <context:component-scan base-package ="com.zjun.appname" /> <tx:annotation-driven transaction-manager ="transactionManager" /> <bean id ="transactionManager" class ="org.springframework.orm.jpa.JpaTransactionManager" > <property name ="entityManagerFactory" ref ="entityManagerFactory" /> </bean > <bean id ="entityManagerFactory" class ="org.springframework.orm.jpa.LocalContainerEntityManagerFactoryBean" > <property name ="persistenceUnitName" value ="appName" /> <property name ="persistenceXmlLocation" value ="classpath:META-INF/persistence.xml" /> <property name ="jpaVendorAdapter" > <bean class ="org.springframework.orm.jpa.vendor.HibernateJpaVendorAdapter" > <property name ="generateDdl" value ="false" /> <property name ="showSql" value ="true" /> </bean > </property > </bean > <jpa:repositories base-package ="com.zjun.appname.dao" repository-impl-postfix ="Impl" entity-manager-factory-ref ="entityManagerFactory" transaction-manager-ref ="transactionManager" /> </beans >
说明: 主要就是 <jpa:repositories base-package="com.zjun.appname.dao"/>,这个可以扫描repository接口。
log4j.properties 1 2 3 4 5 6 7 log4j.appender.stdout=org.apache.log4j.ConsoleAppender log4j.appender.stdout.Target=System.out log4j.appender.stdout.layout=org.apache.log4j.PatternLayout log4j.appender.stdout.layout.ConversionPattern=%d{ABSOLUTE} %5p %c{1}:%L - %m%n log4j.rootLogger=debug, stdout log4j.logger.footmark=debug
创建 Domain 类 1 2 3 4 5 6 7 8 9 10 11 12 13 14 15 16 17 18 19 20 21 22 23 24 25 26 27 28 @Entity @Table(name = "account") public class Account implements Serializable { private static final long serialVersionUID = 1487994788928657645L ; private int id; private String name; @Id @GeneratedValue(strategy = GenerationType.AUTO) public int getId () { return id; } public void setId (int id) { this .id = id; } @Column(name = "name") public String getName () { return name; } public void setName (String name) { this .name = name; } }
创建 DAO 类 1 2 3 public interface AccountDao extends CrudRepository <Account, Integer> { }
说明:
这里实现的是 CrudRepository 接口, 通过这个接口 Spring Data JPA 默认提供了全套的增删改查(CRUD)操作;
也可以实现 JpaRepository 接口,通过定义方法名来定制需要的操作;
泛型中的参数,第一个是Entry类,第二个是这个类ID的类型;
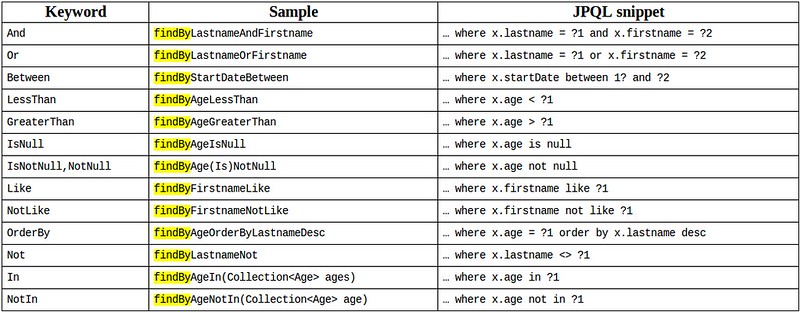
根据规范来对方法进行命名,比如 findByUsername 意思是通过username栏位进行数据查找,具体可以参照下面的表格:
Unit Test Case 1 2 3 4 5 6 7 8 9 10 11 12 13 14 15 16 17 18 19 20 21 22 23 24 25 26 27 28 29 30 31 32 33 34 35 36 37 38 39 40 41 42 43 44 45 46 47 48 @RunWith(SpringJUnit4ClassRunner.class) @TestExecutionListeners({ DependencyInjectionTestExecutionListener.class, TransactionalTestExecutionListener.class }) @Transactional @ContextConfiguration(locations = { "classpath:spring-appname-cfg.xml" }) public class TestAccountDao { private ApplicationContext ctx; private AccountDao accountDao; private Account account; @Before public void setup () { ctx = new ClassPathXmlApplicationContext ("spring-appname-cfg.xml" ); accountDao = ctx.getBean("accountDao" , AccountDao.class); account = new Account (); account.setName("for testing" ); } @After public void clear () { ctx = null ; } @Test public void testCRUD () { Account a = accountDao.save(account); long count = accountDao.count(); Assert.assertEquals(1 , count); Account b = accountDao.findOne(a.getId()); Assert.assertNotNull(b); Assert.assertEquals(account.getName(), b.getName()); b.setName("Test Update" ); accountDao.save(b); Account c = accountDao.findOne(a.getId()); Assert.assertEquals("Test Update" , c.getName()); accountDao.delete(account.getId()); Account d = accountDao.findOne(account.getId()); Assert.assertNull(d); } }
参考资料